Tuesday, December 21, 2010

Kwik Sew's Sewing for Baby by Kerstin Martensson - overalls with feet


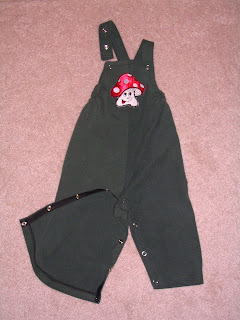
This is the second garment I sewed from the book Sewing for Baby by Kerstin Martensson. I chose this pattern, because DS always pulls off his socks. This overall has feet, as well as snaps for easy diaper changing.

In this one, instead of hammering the snaps, I decided to go with what Kristy suggested: snap tape. Thanks for the comment, Kristy! :)

I also applied Tulip Slick Paint to the feet. Thanks for the tutorial, Cheri! I used dots, as Cheri mentioned that the continuous lines crack in the wash. We haven't tried on the pants yet, so don't know how it works for us, but it seems like a very cool idea, and inexpensive to make. This was my first time using Tulip Paint, so my dots are not perfect. Plus I may need to put more dots on the soles for better grip.

Pattern: Kwik Sew's Sewing for Baby by Kerstin Martensson
Size:
L 6-12 m (comes in XS, S, M, L, XL sizes)
Fabric:
stretch knit
Things I learned:

  • I used a soft knit fabric for these pants, but it was very difficult to work with. it was very stretchy, and I couldn't use my walking foot, as I had to sew so close to the snap tape. The fabric of the snap tape, and the fabric of the pants really didn't like each other (even though I put fusible interfacing on the fabric). The result therefore is a little sloppier than what I normally like. :( But have taken this apart so many times, that I just have to call it done.
  • I had the hardest time figuring out how to add the snap tape so that the edges turn properly. I thought I had it figured out, but it still looks a bit weird. The instructions talk about applied snaps, but not snap tape.
  • If I sew with this fabric again (I still have quite a bit left over), I'll chose a pattern that can be put together entirely with a serger. :)

Kippkopp

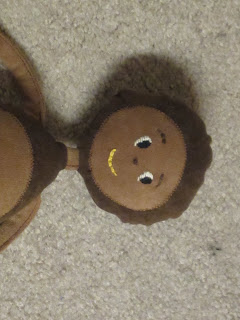
There is a story (actualyl several stories by the same author, Veronika Marék) about a chestnut boy called Kippkopp. I grew up reading Kippkopp stories, and now I read them to my DS, who I am happy to see, loves them as much as I did. Because he likes this character so much I decided to make one out of fabric for him.

I drafted the pattern myself, and made two, I guess you'd call them "muslins," refining the proportions.

If I were to make this now, I think I'd shorten the legs and arms a little bit more.

Also, because I wanted to make this figurine as close to what he looks like in the books as possible, I added a fabric piece as neck, which, even though I sewed a straw inside for reinforcement, still makes the head and body a bit wobbly. If I were to make this now (or again), I'd maybe use the shell of an old pen and try to sew that inside to give the neck some rigidity.

Otherwise, I really like the result, and so does DS, which is what's most important!

Saturday, December 18, 2010

Doggie from Sewing Green by Betz White

I found this doggie adorable in Betz White's book, Sewing Green. I copied out the pattern onto tissue paper, then enlarged it to 133% on a photocopier, as the book suggests.

I used a terrycloth diaper changing pad cover for the body. The cover never fit the changing pad we have, do this was a perfect way to refashion it into something useful.

I bought a fat quarter of solid red and one of the brown patterned material for the ears, tail, nose, and spot.

I embroidered the eyes with black perle cotton. Added a French knot (as described in the book) of white perle cotton for the glistening in the eyes.

I stitched around one eye and the dot in red perle cotton.

Fairly easy project, and the result is sooooo cute!

Friday, May 28, 2010

Kwik Sew's Sewing for Baby by Kerstin Martensson - bib pants with vertical seam


Snaps attached.
1/2 in bias tape facing.
1/4 in elastic and casing; adjustable straps.

There are lots of baby clothes patterns in the book Sewing for Baby by Kerstin Martensson. I chose the bib-pants pattern with a vertical seam down the front and elastic in the back.

Some of the patterns in this book have a retro feel to it, while others look more modern.

Since I hadn't tried out any of these patterns before, I chose an old sweatshirt for fabric. The collar of the sweatshirt had holes in it, but the rest of the fabric feels great.

Pattern: Kwik Sew's Sewing for Baby by Kerstin Martensson
Size:
L 6-12 m (comes in XS, S, M, L, XL sizes)
Fabric:
old sweatshirt (cotton knit)

Things I learned:

  • While I hadn't had much success with refashioning up until now, I have now proven to myself that I can actually do it.
  • Interfacing the facing doesn't always work on baby clothes; even a light-weight interfacing makes it too still for baby clothes.
  • A 0.6 cm seam allowance is plenty for baby clothes.
  • Note to self: I almost messed up these pants, because I cut both sides on the same side of the fabric, instead of mirror images. I saved it by making one side on the reverse and the other on the right side of the fabric, and followed the same with the straps, thus making it part of the design, BUT if it hadn't been a baby garment, I probably wouldn't have been able to get away with that.
  • Applying snaps using a pencil eraser, a wooden cuttingboard, soft fleece, and a hammer is VERY time consuming. Not to mention, hard on one's fingers, because no matter how much you try to use the eraser to get the prongs to go through the fabric, sometimes, you can achieve better results with your fingers, but after applying 22 snaps, they do start hurting....

Saturday, April 24, 2010

Men's flannel shirt (Simplicity 4760)


Pattern: Simplicity 4760
View: A
Size:
S (sizes S-XL)
Fabric:
Flannel

Things I learned:

  • I could have made it even smaller: the shoulder comes too low and the sleeve is too long.
  • I should also have clipped the seam allowances smaller and/or graded them to reduce bulk in corners.
  • I am proud of how I matched the plaid at the pocket.

Friday, April 23, 2010

Follow-up post to: Small refashions and adjustments

This is a follow-up post to: Small refashions and adjustments

Jo asked how I did the shortening of the sleeves on the white striped blouse.

So here it is: This below picture shows what the sleeve looked like.

I studied how the cuff was attached, measured the pleats, then removed the cuff, and cut the rest of the sleeve to the right length.

After that, I reattached the cuff.

I paid close attention to making the pleats the right size.